Blog
Why Choose Schluter®-KERDI for Your Shower Remodel?
When it comes to remodeling a shower, it’s easy to focus on the final look—tiles, design, colors… But there’s something even more important that often goes unnoticed: waterproofing.
And this is where one of the most reliable products on the market comes in: Schluter®-KERDI.
Schluter®-KERDI is a high-quality waterproofing membrane designed specifically to protect showers and other wet areas from water damage. Its main function is to create a continuous barrier between water and the underlying structure, preventing long-term issues.
1. Complete Protection Against Leaks
KERDI completely seals the surface, preventing water from seeping into walls or floors. This helps avoid common issues like mold, persistent dampness, or material deterioration.
2. Greater Long-Term Value
A properly waterproofed shower not only looks better—it lasts longer. KERDI protects the internal structure of the shower, meaning fewer repairs and more years of worry-free use.
3. Fast and Efficient Installation
Thanks to its flexible and lightweight design, KERDI is easy to install and adapts to all kinds of layouts, including custom showers. It also integrates seamlessly with other Schluter products, providing a complete and hassle-free system.
4. Perfect Base for Tile Installations
This membrane is designed to work with ceramic, porcelain, or natural stone tile finishes, offering a strong and secure base that enhances tile adhesion.
5. Certified Quality You Can Trust
Schluter® is a globally recognized brand known for its innovation and quality. Using KERDI in your project means relying on a system that professionals around the world trust.


Discover the Elegance and Durability of Vinyl Flooring.
When it comes to choosing flooring for your home, the decision can make a significant difference in both aesthetics and functionality. While carpet has been a popular choice for years, vinyl flooring has emerged as a modern and superior alternative in many aspects. Why should you consider vinyl flooring over carpet? Here are some compelling reasons:
1. Unmatched Durability
Vinyl flooring is known for its exceptional resistance and durability. Unlike carpet, which can quickly wear out and stain over time, vinyl floors are resistant to stains, scratches, and general wear and tear. This means you can enjoy their beauty and functionality for years without worrying about costly renovations.
2. Easy to Clean
Keeping vinyl floors in pristine condition is straightforward. You only need a damp cloth and mild detergent to remove dirt and stains, whereas with carpet, you often require powerful vacuum cleaners and special treatments for proper cleaning. Vinyl floors are a perfect choice for homes with children, pets, or allergy sufferers.
3. Variety of Designs
Vinyl flooring offers a wide range of designs and patterns, from wood and stone imitations to more creative options. You can find a style that perfectly suits your home’s aesthetic without sacrificing beauty or quality. Moreover, modern technology has improved the realistic appearance of vinyl floors, making them virtually indistinguishable from their natural counterparts.
4. Water Resistance
One of the biggest benefits of vinyl flooring is its water resistance. Unlike carpet, which can be severely damaged by accidental spills, vinyl floors are waterproof and easy to clean in case of spills. This feature makes them an ideal choice for kitchens, bathrooms, and high-traffic areas.
5. Easy Installation
Installing vinyl flooring is quick and efficient compared to carpet, which often requires the assistance of professionals. Vinyl floors often come in a click-lock format, allowing for a “do-it-yourself” installation for those with basic DIY skills.
In summary, vinyl flooring surpasses carpet in terms of durability, ease of cleaning, design versatility, and water resistance. If you’re looking for a flooring option that combines functionality and style without compromising on quality, vinyl flooring is the smart choice. Transform your home with the elegance and durability that only vinyl floors can offer.
Preserving the Beauty.
Proper Maintenance for Vinyl Flooring
Vinyl flooring has become a popular choice for homeowners and businesses alike due to its durability, versatility, and attractive appearance. To ensure that your vinyl floors continue to shine and perform at their best, it’s essential to implement a good maintenance routine. Here are some key tips for preserving the beauty and longevity of your vinyl flooring:
1. Regular Cleaning.
The foundation of vinyl floor maintenance is regular cleaning. Sweep or vacuum the floor to remove dust, dirt, and debris daily. This prevents these particles from scratching the surface over time. For deeper cleaning, use a damp mop with a mild vinyl floor cleaner. Avoid abrasive scrubbers or harsh chemicals, as they can damage the vinyl’s protective layer.
2. Immediate Spill Cleanup.
Accidents happen, and spills are inevitable. However, it’s crucial to address spills promptly. Wipe up any liquids or stains immediately to prevent them from seeping into the seams or causing discoloration. The longer spills are left unattended, the harder they can be to remove.
3. Use Doormats and Area Rugs.
Placing doormats at entryways and using area rugs in high-traffic areas can help minimize the amount of dirt and grit brought onto your vinyl floors. These protective measures can significantly reduce the risk of scratches and abrasions.
4. Furniture Pads.
To prevent scratches and scuffs from furniture legs, use furniture pads or felt protectors. When moving heavy furniture, lift it rather than dragging it across the floor, as dragging can cause damage.
5. Avoid Harsh Chemicals.
Steer clear of harsh cleaning chemicals, such as ammonia or bleach, as they can damage the vinyl finish and cause discoloration. Stick to pH-neutral vinyl floor cleaners recommended by the manufacturer.
6. Manage Moisture.
While vinyl flooring is water-resistant, excessive moisture can still damage it over time. Wipe up spills promptly, and use mats in areas prone to water exposure, like kitchens and bathrooms. Additionally, ensure that your home’s humidity levels are within the recommended range to prevent issues like warping.
7. Periodic Polishing.
Some vinyl flooring types may benefit from periodic polishing to maintain their shine. Check the manufacturer’s recommendations for the specific type of vinyl you have. Avoid over-polishing, as it can lead to a slippery surface.
8. Routine Inspections.
Regularly inspect your vinyl flooring for any signs of wear, tears, or loose seams. Address any issues promptly to prevent them from worsening.
By following these maintenance guidelines, you can extend the life and beauty of your vinyl flooring. Proper care not only enhances the appearance of your home but also ensures that your investment remains in top condition for years to come. With a little attention and care, your vinyl floors will continue to provide the durability and aesthetics that make them a fantastic choice for any space.

Elevate Your Kitchen
to the 21st Century
Trends in Cabinets with Professional Installation
The heart of any home is the kitchen, and in the world of interior design, kitchen cabinets are the crown jewel. Currently, kitchen cabinet trends are experiencing an exciting revolution, combining style, functionality, and professional installation to create spaces that inspire admiration. Here are some of the hottest trends in kitchen cabinets:
1. Minimalism and Clean Lines.
The minimalist aesthetic remains an undisputed favorite. Kitchen cabinets with clean lines and no superfluous adornments create an elegant and contemporary look. Neutral colors like white, gray, and black are popular for achieving this style.
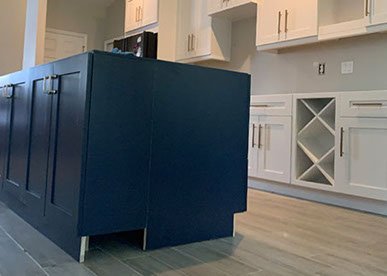
2. Bold Colors.
Dare to stand out with bold colors for your cabinets. Deep tones such as navy blue, emerald green, and dark red are gaining ground. These colors add a touch of personality and drama to the kitchen, creating a unique and striking atmosphere.
3. Two-Tone Cabinets.
The trend of combining two different colors in cabinets is on the rise. You can opt for a contrasting color for a kitchen island or mix colors in upper and lower cabinets to create visual appeal and a sense of balance.
4. Modernized Shaker Style.
Shaker-style cabinets have evolved. They now feature slimmer profiles and subtle details that add a modern touch without sacrificing the timeless simplicity that characterizes this style.
5. Open Cabinets and Floating Shelves.
The trend of open cabinets and floating shelves continues to gain followers. These elements bring an airy look and allow you to display dishes and decorative items. When combined with traditional cabinets, they create a charming balance.
6. Innovative Materials.
Kitchen cabinets are now made from a wide variety of innovative materials. High-gloss laminates, reclaimed wood, and metallic surfaces are on the rise, providing versatile and sustainable options.
7. Professional Installation.
Ensuring that your cabinets are professionally installed is essential to achieving a flawless finish and optimal functionality. Installation experts ensure that each cabinet is level and fits perfectly, maximizing storage space and the overall appearance of your kitchen.
In summary, current trends in kitchen cabinets celebrate creativity and functionality. From elegant minimalism to bold colors and material combinations, there are endless options to personalize your space. And, remember, professional installation is key to making these trends look and function exceptionally. Refresh your kitchen with cabinets that reflect your style and trust experts to bring it to life. Your kitchen deserves the best, and these trends will help you achieve that goal.
Renewing Your Kitchen Cabinets with Paint.
Steps and Tips from an Expert Painter
Renovating your kitchen cabinets through a paint restoration is an excellent way to breathe new life into your space without spending a fortune on cabinet replacements. As an expert painter, I’ll provide you with the essential steps and key tips to achieve a professional result:
Step 1: Preparation
Before you begin, make sure you have all the necessary tools and materials:
– Fine and medium-grit sandpaper.
– Grease cleaner.
– Rags and towels.
– Painter’s tape and plastic sheeting to cover areas you don’t want to paint.
– High-quality cabinet paint in your chosen color.
– High-quality rollers and brushes.
– Adhesive primer (if necessary).
– Wood putty (if necessary).
Step 2: Disassembly and Cleaning.
Remove all cabinet doors and drawers. Clean them thoroughly with a grease cleaner to remove grease and dirt buildup. Proper cleaning is essential for good paint adhesion.
Step 3: Sanding.
Lightly sand the cabinet surfaces with medium-grit sandpaper to remove any old finish or irregularities. Then, use fine-grit sandpaper to smooth the surface. This will provide a proper base for the paint and help it adhere better.
Step 4: Repair and Putty.
If there are holes, cracks, or imperfections in the cabinets, apply wood putty and sand again when dry to achieve a smooth surface.
Step 5: Priming (if necessary).
If your cabinets are untreated wood or have a glossy surface, applying adhesive primer is important to ensure good paint adhesion. Follow the manufacturer’s instructions and sand lightly after the primer has dried.
Step 6: Painting.
Begin by applying an even coat of paint to the prepared areas with a high-quality brush or roller. Make sure the paint is well-distributed and free of drips. You can apply several thin coats instead of one thick coat for a smoother and more durable finish.
Special Techniques.
– Aged or Distressed Effect: To achieve this effect, you can gently sand the edges and prominent areas after the paint has dried.
– Linen or Fabric Effect: Apply a coat of paint in one color and, before it dries, pass a cloth or fabric over the surface to create a subtle texture.
Step 7: Sealing and Reassembly.
Once the paint is completely dry, apply a polyurethane sealer or clear varnish to protect and seal the paint. After the sealer has dried, reassemble the doors and drawers in place.
Additional Tips:
– Work in a well-ventilated area to avoid paint fume buildup.
– Use high-quality paint designed for kitchen cabinets for enhanced durability.
– Be patient and take your time to achieve professional results.
By following these steps and techniques, you’ll be able to transform your kitchen cabinets with a paint restoration that highlights their beauty and functionality. Enjoy your refreshed kitchen!

Transform your spaces with unmatched style and quality, Discover World Hands Solution’s remodeling solutions today.
Our clients are thrilled with the results we deliver. Their satisfaction is our greatest reward. In every project, we strive to exceed their expectations and leave them amazed by the final outcome. With personalized attention, exceptional quality, and a focus on their needs, we have earned the trust and loyalty of our clients. Their testimonials speak for themselves, reflecting the dedication and commitment of our team. At World Hands Solution, we not only meet expectations, we surpass them, creating experiences that leave a lasting impression and form the foundation of enduring relationships.